Image Map

Apr 29, 2016

Foodie Friday: Fat Melts Diner

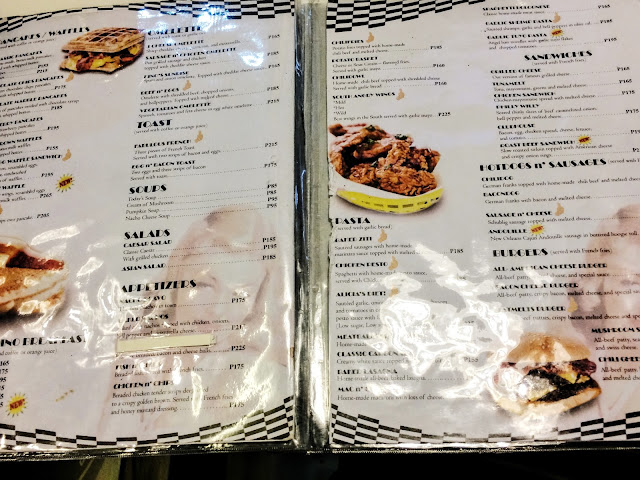
Last Sunday, my husband and I accompanied my brother to BF Parañaque since he needed to go shopping for his upcoming trip to Boracay. We also decided to have a look at the Pergola mall across ruins and my husband happened to have a look at the Fat Melts Diner menu which was conveniently posted outside their restaurant and asked me if I wanted to review it for my Foodie Friday (I appreciate the fact that he totally supports my Foodie Fridays) and I agreed since I've always been curious about the place. Quick confession: I'm a sucker for retro diners like this. 

Fat Melts Diner

Fat Melts Diner

Fat Melts Diner

Foodie Friday

Fat Melts Diner

Lately, I've been having massive cravings for sweets which is strange since I know pregnancy cravings only happen during the first trimester, right? I also appreciate that my husband understands this and does his best to (sometimes even go out of his way to) provide me with all the food I'm craving for. Case in point: he already knew I was going to order the extra thick chocolate milkshake, and he went for the extra thick vanilla one (both at 135Php) 

Fisherman's Catch
I couldn't decide between the Garlic Shrimp Pasta (185Php) and Fisherman's Catch (195Php) so my brother suggested that he'll order the Garlic Shrimp Pasta and I can have the Fisherman's Catch and we could just have a bite of each other's food. I absolutely loved the Garlic Shrimp Pasta and while the Fisherman's Catch was also really good, I felt that the rice was covered in too much butter and it made me feel a little woozy. If you wanna try this dish out, I suggest accompanying it with soda so you don't get too lightheaded from all the butter. The chocolate milkshake helped too :) 

Garlic Shrimp Pasta

Bacon Cheeseburger
My husband had the Bacon Cheeseburger (165Php) which, of course, I didn't try out since I don't eat pork nor beef, but I did eat some of his fries which was obviously (it's fries!) really good. At first, when our orders haven't been served yet (by the way, they kind of took a long time to serve our food, we noticed), I was already planning on sharing a banana split (175Php) with either my husband or my brother and maybe add a basket of fries (Potato Basket at 160Php) for good measure, but it turned out that what we ordered were already enough for us. My husband loved the food so much and said the prices were affordable and totally worth it. I think so too. 

Murashopph Clothing
Wearing: dress from Murashopph Clothing, sandals from Cheska, thrifted (I think) bag

Apr 20, 2016

Beauty Review: Holika Holika Sweet Cotton Pore Cover BB + Nippon Pro Blend Sponge

Holika Holika Sweet Cotton Pore Cover BB

Hi, guys! I have another beauty review for you and I feel like it's taken me a long time to put this up. Anyway, so I was running out of BB cream and thought to try out a new one and since I like Korean BB creams, I decided on Holika Holika, a brand that I have never heard of until this year. Holika Holika has a lot of BB cream products you can choose from and I guess one of their most popular is the Aqua Petit Jelly BB Cream, but I decided to try something a bit newer. 

Holika Holika Sweet Cotton Pore Cover BB

The great thing about the Holika Holika Sweet Cotton Pore Cover BB is that you get good coverage with a pea-size amount. That is if you're using your fingertips to apply this all over your face. Since I applied mine with a Nippon Pro Blend sponge, I had to use a bit more than just a pea-size amount. 


Holika Holika Sweet Cotton Pore Cover BB


I have never used a blending sponge to apply foundations and/or BB creams before therefore it felt a bit awkward to me applying the Holika Holika Sweet Cotton Pore Cover BB cream with my Nippon Pro Blend sponge, but I think I went about it the right way. The sponge helped me spread/blend the product evenly on my face and I sort of felt cleaner using the sponge than when I use my fingers (of course you have to always make sure that the sponge or whatever applicator you're using is clean) 

I skipped applying face powder or finishing powder just so you guys could see the result after a couple of hours of wearing the product. 

So during the time I was reviewing this, I didn't go anywhere. I just stayed home and did my regular house chores (washing clothes and dishes, cooking, cleaning, etc.). By around 8pm (I applied the BB cream at around 4-4:30 pm), I could see that the Holika Holika Sweet Cotton Pore Cover BB was still on my face, meaning it didn't completely wash out or faded, but I did also notice that my T-zone got a little bit oily which is only normal especially when you don't apply finishing powder on top of it and you don't retouch (with pressed powder) or use blotting paper. 

Overall, I really like this BB cream and might consider repurchasing in the future. 

Nippon Pro Blend Sponge

As I've previously mentioned, I enjoyed using the Nippon Pro Blend sponge because it was quite soft and it made applying the BB cream easy. Plus, I felt like I wasn't putting germs on my face since I didn't have to use my fingers (and of course, the sponge was clean). I think that the Pro Blend Sponge Cleaner did a good job with cleaning my sponge since it didn't take me more than a few squeezes of the sponge before the makeup stain completely disappeared (although not from the sponge, I'm afraid) and all that was left was clear water. What I didn't like about the cleaner though is that it was difficult to get the product out from the bottle. Like squeezing the bottle won't do you much good. You have to continuously shake it down to get the product out and onto the sponge. I hope they have a pump for the bigger one (I saw on their site that their 100 ml bottle is the same as this little one) for easier use. 

Here's my video review of the Holika Holika Sweet Cotton Pore Cover BB cream and the Nippon Pro Blend Sponge and Sponge Cleaner: 


Apr 15, 2016

Foodie Friday: Sol Victoria's

From time to time, I would ask my fiancé to take me out to dinner or lunch because I still want to go out on dates with him even if we're already about to get married, and it's something I think all couples should do to maintain the romance in their relationship. We would research places we haven't yet been to and try them out. Plus, it's good for my Foodie Friday posts. That's like hitting 3 birds with one stone, right?! Anyway, he was busy this past few days with work and so we decided to go somewhere nearby. We were supposed to try Wild Wild Wings, but it looked like they were in the midst of renovating the place so we decided on Sol Victoria's (located in Better Living Parañaque) instead.

Sol Victoria's
Apologies for the quality of this photo and for that finger on the top part (I was not comfortable taking photos in public) 
Sol Victoria's

I regret to mention that I failed to take more photos of the place to explain better how it looked inside since there were a lot of people dining there and I was not comfortable taking photos like some wannabe food blogger (which I am, I think). But yeah, inside to the left (upon entering), there's a more open area for those who wants to chill, have some drinks with their buddies and smoke while on the right side is a closed space with aircon and glass walls and sliding doors to accommodate families who wants to dine with their kids and be away from the cigarette smoke... that or they want to get away from the unbelievable heat we are currently experiencing in this country. 


I ordered Victoria's wings (200Php) and ripe mango shake (100Php) while my fiancé had creamy beef (250Php). We also ordered Java rice (150Php) to accompany our choices of food. 


The Victoria's wings came with mustard and mango dip and it was so so good! Even the wings eaten sans the dip was very delicious; they were crunchy and juicy. I honestly enjoyed every bite. My fiancé made me try out the creamy beef's sauce and at first I didn't want to since I don't eat beef and/or pork, but he convinced me that there weren't any on the sauce he was offering to me. It sort of tasted like carbonara sauce or cream of mushroom and I liked it, BUT I still did not eat more than what was offered to me. 

The java rice. Oh I don't really know what to say. I'm used to java rice being plain (meaning without added bits and pieces of whatever) and orange-y and so I did not expect it to have bits of- I suspect- meat. It was a task having to separate most of the meat from the rice since they were so minuscule. I had a hell of a time with the rice, but it was still quite delicious and I didn't let the itty-bitty pieces of meat stop me from enjoying my food. 

Ripe mango shake is ripe mango shake. It was very yummy (did not taste like water) and perfect for the summer heat. 

I would definitely recommend Sol Victoria's as a go-to place to have an affordable laid back and delicious dinner/lunch. 

Apr 11, 2016

Maternity Fashion Featuring "Buntis" from Landmark

Back when I wasn't pregnant yet, I have always pictured myself looking fab when the time comes for me to carry my own little bun in the oven. I really wanted to wear dresses ALL. THE. TIME. 

And now here I am, 6 months pregnant with my first baby and I'm left thinking, "what the hell is happening? Where are all the dresses I dreamt of wearing?!" Okay, so a quick fact about me: I am very stingy when it comes to buying clothes for myself. I'm the type who would rather spend time browsing the racks of thrift stores than pay full price for a top or a dress. I find 500 Php to be way too much to spend on t-shirt or a fast fashion top. Heck, even when these clothes are already on sale at 300 Php, I still have a hard time parting with my money. BUT. Hehe, there's always that "But"; when it comes to shoes, bags, makeup AND food, my motto seems to be: "money is no object." I really can't explain why except that these things (with maybe the exception of food) are enough to enhance even the most basic outfits and I'd rather really spend on those instead. 

ANYWAY, as you can probably tell by now, I was left with no decent clothes that would accommodate my growing belly and even my fiancé's mom (to her horror, I assume) noticed that I was still wearing my denim shorts at almost 5 months pregnant. Hence, the dresses she got for me from Landmark. I am so grateful to her because I really didn't expect her (or my fiancé for that matter) to buy me maternity clothes. I just figured I'd get around to buying a few when I'm starting to really (I mean, REALLY) feel the need to. 

And since I ALWAYS forget to do OOTDs when I go out, I decided to just do sort of a try on post of the 3 dresses from the label "Buntis" from Landmark instead (btw, if I have readers who do not speak Tagalog, buntis means pregnant in English). 


landmark

landmark

landmark

One other thing that I found to be a pleasant surprise was that, I actually love the design and fit of these dresses. I probably wouldn't even give these dresses a second thought if it had been me browsing through the racks of Landmark. Huh, goes to show how prejudiced I am. But yeah, this made me realize that I really should give clothes a chance and definitely, definitely try them on! Another quick fact about me: I HATE trying on clothes when shopping. 

Hopefully, I can suppress the urge to buy more makeup and instead buy a few more maternity clothes :) 

Apr 8, 2016

Beauty Review: Etude House Tint My Brows Gel

Just like many other people out there, I have a lot to be conscious about when it comes to my appearance; my teeth, my eyes, especially my eyebrows! I have sparse eyebrows so it's quite understandable why an eyebrow pencil, powder, gel, heck even temporary tattoo(!) is a definite must-have in my makeup bag. 

Okay, so about that temporary eyebrow tattoo. It's something I have just recently found out about and the thought of saving time everyday getting ready appealed to me. Enter Etude House Tint My Brows Gel. 

etude house tint my brows gel

I've been hearing stuff about this particular product and thought, why not give it a go? So to the Etude House store I went and purchased their Tint My Brows Gel. I was both nervous and excited as the day came to finally try it out (a day where I had nowhere to be, but at home, safe from the inquisitive eyes of people). 

etude house tint my brows gel

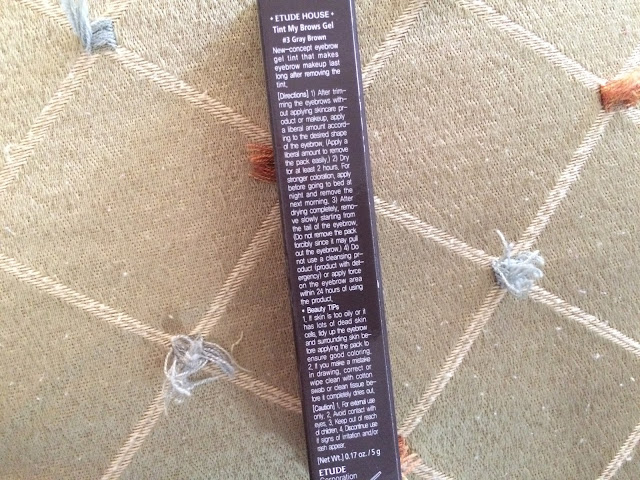
So this is what it says on the back:

Directions:
            1. After trimming the eyebrows without applying skincare product or makeup, apply a liberal 
                amount according to the desired shape of the eyebrow. (Apply a liberal amount to remove the pack easily.)
2. Dry for at least 2 hours. For stronger coloration, apply before going to bed at night and remove the next morning.
3. After drying completely, remove slowly starting from the tail of the eyebrow. (Do not remove the pack forcibly since it may pull out the eyebrow.)
4. Do not use a cleansing product (product with detergency) or apply force on the eyebrow area within 24 hours of using the product.

Beauty TIPs:

1. If skin is too oily or it has lots of dead skin cells, tidy up the eyebrow and surrounding skin before applying the pack to ensure good coloring.
2. If you make a mistake in drawing, correct or wipe clean with cotton swab or clean tissue before it completely dries out.

I got even more nervous when I saw the gooey consistency of this product, but I sucked it up (no, not the product) and proceeded to apply it onto my eyebrows.


To be honest, I wasn't very satisfied with my application since it looked to me uneven and I want my brows to be even. However, I found out that it wasn't that bad. Sure, the left brow looked a bit thicker than I would've wanted it to look, but it's nothing that I can't live with.


Peeling it off was surprisingly easy. Not much eyebrow hair got snagged and the end result looked actually good.


Okay, to be totally honest with you guys, I redid the whole process after three days because I felt like I made a mistake the first time I applied this Tint My Brows Gel. So on the first try, after a couple of minutes of peeling it off (and having this photo taken), I got bothered by the bits and pieces of leftover peeling stuck on my eyebrow hair so I stupidly went to get a piece of cotton, wet it a  bit, and wiped off the leftover peelings with it. I guess you shouldn't do that because it left my eyebrows looking greenish and just plain weird. I had the misfortune of having to go out after that (because I needed to meet my brother at the mall) and while I was browsing through the makeup department, I swear all the saleslady I came across was suggesting eyebrow products. I'm guessing it was THAT obvious that my eyebrows were in a state of despair.

So I tried it out again, this time I was careful not to make my eyebrows look too thick and I definitely did not try wiping the excess peel-off with wet cotton. Needless to say, the result was better the second time around.


Below are a series of photos I took for 4 consecutive days just so you guys can see and compare. By the way, if you want to know how my eyebrows look sans makeup, please watch the YouTube video review I did on this (which I will also paste at the end of this post).


And then here are days 5 to 7:


I don't know if you can see much difference from Day 4 up to Day 7. I did notice that the tint on the tail end part of my eyebrows completely faded whereas the tint on the part of my eyebrows near the inner corners of my eyes did stay up to today, my 7th day, albeit barely noticeable (but upon closer look, you can tell). Overall, I am quite satisfied with this product and if like me, you have sparse eyebrows, you can reapply the tint after 4 days because after that, it's not going to be really noticeable anymore.

What I did when I saw some parts of the tint fading is just fill in those parts where the tint has already faded. It still saves you time getting ready.

So that's my review of the Etude House Tint My Brows Gel and I'm giving it 3.5 stars (I mean, it's not exactly their fault I have barely there brows, right?) and would consider repurchasing.

If you guys want me to review specific products, do let me know on the comment box. I'd be more than happy to oblige :)