Image Map
Showing posts with label Beauty Review. Show all posts

Dec 27, 2016

Beauty Review: Sleek MakeUp i-Divine On the Horizon Palette


sleek makeup

A couple of weeks back, I heard about the 3 new limited edition eyeshadow palettes that Sleek MakeUp was releasing (On the Horizon, Goodnight Sweetheart, and Nordic Skies), and being a fan of Sleek MakeUp and currently being obsessed with experimenting with eye makeup looks, I went ahead and purchased the On the Horizon palette. I initially wanted to purchase two and kept asking about the Goodnight Sweetheart palette, but they were out of stock in the SM Department store I frequently visit which is in Makati. I would get the Nordic Skies too, but I'm still on the fence about that since I'm not totally sure about the shades in that particular palette. 

Now back to the palette that I got. On the Horizon is actually my first choice of palette to get because I've been wanting to experiment with orange-y eyeshadows and the swatches I've seen online were pretty impressive. 

It did not disappoint.

sleek makeup on the horizon

sleek makeup eyeshadow palette 
The color payoff of the shades here are really amazing save for "beech" because that doesn't really show much. It's a very subtle shade that is perfect to use as an eyeshadow base. The "fawn" shade needs to be packed on a lot for it to show on its own, but I personally think that it's better used on top of another eyeshadow (it looks amazing on top of "bonfire"). 

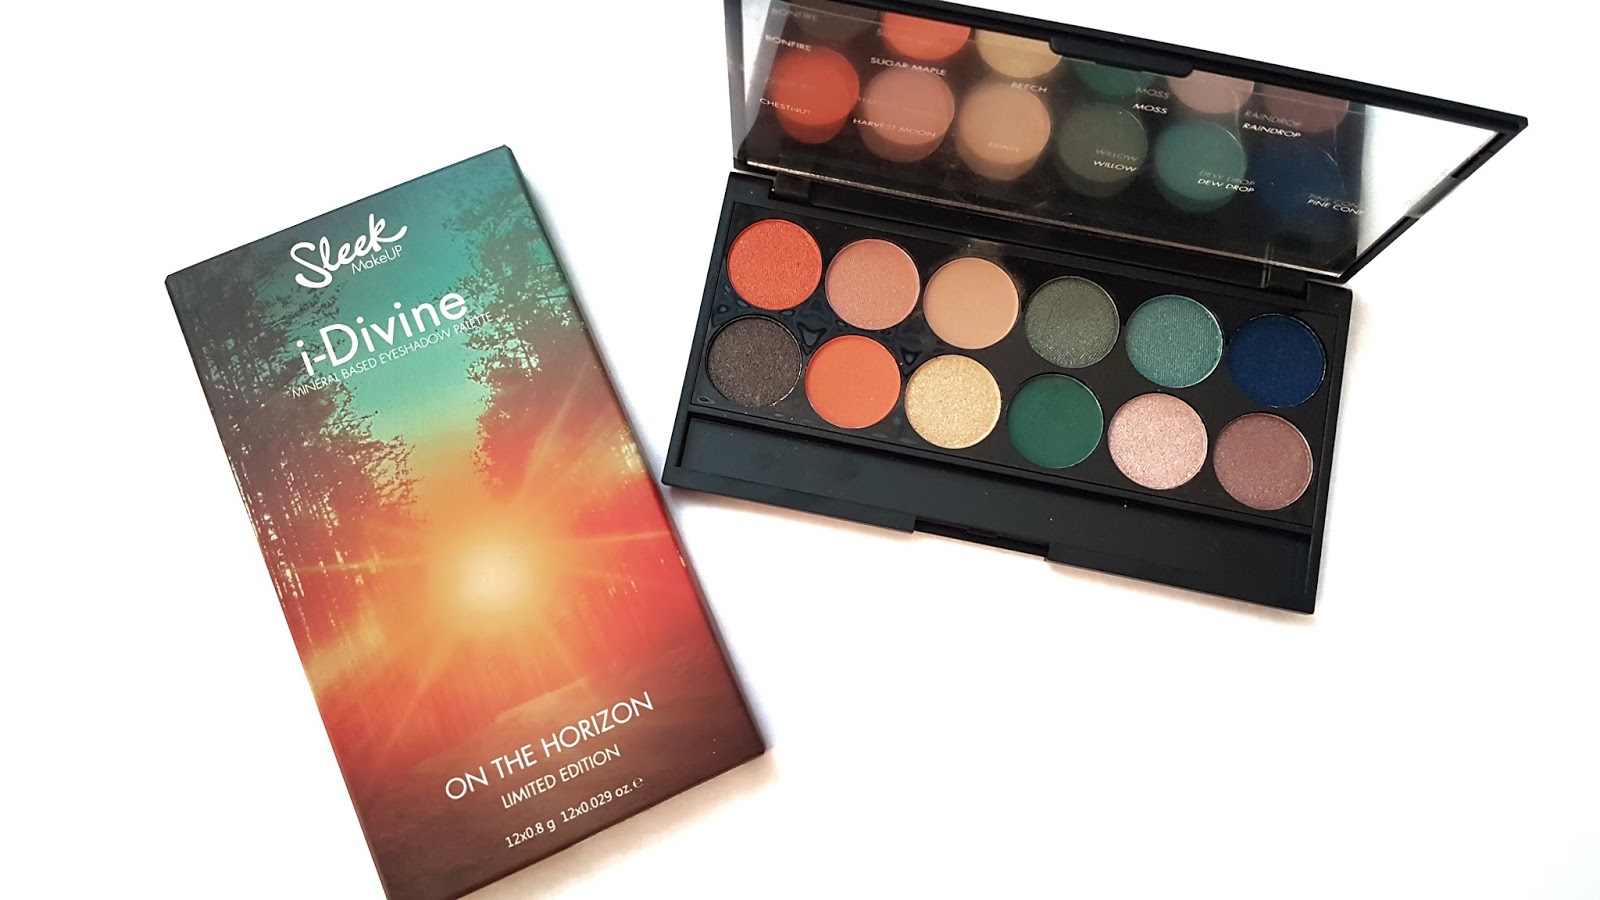
So as you can see, this palette (as with the rest of the Sleek i-Divine palettes) comes with 12 shades; 3 mattes ("beech", "harvest moon", and "willow") and 9 shimmer shades. However, some of the shimmers here look more satin-y than shimmery, and the shade "dawn" which is the deep blue one, leans towards matte more than shimmer, but on the palette it has hints of shimmer on it.  

L-R: pine cone, dew drop, willow, fawn, harvest moon, chestnut, dawn, raindrop, moss, beech, sugar maple, bonfire
 The great thing about this palette is that the eyeshadows are long-wearing. I had this on from around 4pm up till 2:15 am and my eye makeup (all from the i-Divine On the Horizon palette) was still intact, and still very pigmented. I also personally liked the fact that this particular palette came with some mattes just because I find it easier to work with a palette that has both matte and shimmer in it especially when I'm doing reviews or looks on a palette. Application-wise, the shades are build-able and are easy to blend and I haven't noticed any fallouts (which could also be because I tap off the excess from the brush before applying the eyeshadows on my lids). 

the bohemian doll
It doesn't look as pigmented on cam since I'm using the front-facing camera of my Samsung S7
Overall, I really don't have any complaints about this palette except that I only wish they would have put the artwork on the box on the palette as well, but then when you think about it, that might cost more than Php695 already and if that were the case, then I'd take the plain old black Sleek MakeUp i-Divine palette packaging. If I were to rate this product out of 10, I'd say this is an 8. 

I also have a video review of this product on my YouTube channel: 


Dec 3, 2016

Beauty Review: Sooper Beaute Wonder Cream

sooper beaute wonder cream
30g Sooper Beaute Wonder Cream 

If you've been following my blog, this product might seem familiar to you and that's because I featured this in my BeautyMNL mini haul. I was running out of BB Cream and I needed something to blend with my Milani Conceal and Perfect 2-in-1 Foundation because it was a tad dark for my skin tone so I decided to purchase a BB cream or new foundation. Since I wanted to hit a lot of birds with one stone, I decided to get something new so I can do a review of it as well. 

I also decided to go local hence this Sooper Beaute Wonder Cream (yes, it is Filipino made). I noticed on their site that there's an option for currencies therefore it could mean that they also ship to other countries, but I have yet to receive their reply on my query regarding that. (Update: Yes, they do ship worldwide) 
 
sooper beaute wonder cream

I like that the Sooper Beaute Wonder Cream came in a pump bottle as I feel that pumping out the product is more hygienic than scooping it out with your fingers. 

Okay, so the Wonder Cream has a creamy texture especially when pumped out and it gradually becomes a tad watery when blended out and true to its description, "leaves a powdery veil on the skin". That said, I suggest you apply on as much as you intend to on your face in one go and do your best to blend it out evenly because once it sets, it's hard to build up. I found that the Wonder Cream is not buildable because it does become powdery and it just ends up getting messy (streaky) if you try to build it up (in my case). Also, the Wonder Cream has a light powdery smell which isn't at all too strong nor offensive. 

sooper beaute


I also wouldn't suggest tanned women (girls, men, etc.) to use this product just because even on my skin tone, it still made me look a tad bit whiter or fairer. It does a good job of making my face sort of flawless (also with the help of a somewhat clear skin of course); however, it does not cover under eye circles well so a concealer will definitely be needed especially if your dark circles are a bit difficult to hide. 

The longevity of this product on my face is really good. After 9 hours, that's when I started looking oily on my T-zone so if you're considering getting the Sooper Beaute Wonder Cream, you may want to keep an oil-control film or blotting paper with you or a face powder. For me, that's not a deal-breaker considering how rarely I stay out for more than 5 hours. 

Overall, this is a really good product which I will have no qualms of re-purchasing in the future. 

As of this writing, the 30g pump bottle is out of stock, but both BeautyMNL and the Sooper Beaute site have this product available in a 10g tub which retails for Php 100


I did a video review of this as well which you can check out on my YouTube channel or click to play the video below: 


Nov 23, 2016

Beauty Review: Pop Beauty Permanent Pout


I recently just started subscribing to Glamourbox, a beauty subscription box here in the Philippines and last October, they had the Pop Beauty special edition box which I immediately subscribed to (especially after finding out that the brand is cruelty free). I was quite happy with the stuff I got and this is one of the products included in the Pop Beauty special edition box. 

This Permanent Pout lip paint is in the shade Razzle Rose and all the while I thought that the shade would lean more on a brighter pink or red hue. Needless to say I was utterly surprised to find out that it was more on the brownish side. I doubt I could pull off a brownish color so I wasn't exactly ecstatic when I first tried it on, but it grew on me and now I love it! I'm actually even thinking of getting more lip products in varying shades of brown. That's how hooked I am. 

Anyway, so this product retails for Php750 and I personally think that that's a fair price to pay considering all the good stuff that comes with purchasing this product i.e. paraben free, cruelty-free, great color payoff, and the size! At first glance, I thought "wha-?! Why is this a mascara? I thought I was getting a lip product?" The packaging is very much like how a mascara would be packaged. Not to mention that the silver color of the packaging gives the Pop Beauty Permanent Pout a very classy look. 

At first application, the texture is very creamy and a little on the sticky side. After a few seconds, it becomes more velvety, and when it dries? It feels like you aren't wearing any lip product on your lips. It's very matte, but not drying. The Pop Beauty Permanent Pout does not transfer on your skin when you kiss it so I'm assuming that it doesn't transfer to your lover's kissers when you make out. It is long-lasting since I applied this product at 7:24 am and slept till 1:11 pm and this was how my lips looked: 


But then I got hungry and ate leftover fried chicken fillet and I found out that like my other liquid matte lip products, the Pop Beauty Permanent Pout lip paint also wears off after eating. It didn't completely wear off, but still enough for me to want to reapply. 


It is no longer a deal breaker for me though since I haven't really found a lip product that does not wear off even after eating. If such a product exists and you happen to know about it (and it doesn't cost an absurd amount), I'd love it if you'd let me know. 

So yeah, I figure I'm still going to re-purchase or heck, even purchase another one in a different shade this time. I give this Pop Beauty Permanent Pout a 4 out of 5 stars!

Check out my video review on YouTube:

Oct 17, 2016

Beauty Review: NYX Sculpt & Highlight Face Duo


Nowadays it seems like your look isn't complete or "on fleek" if it isn't contoured and highlighted. Everywhere you look (well, on Instagram and YouTube in my case), FOTDs (Face of the Day) are mostly of ladies with on-point brows, chiseled faces, and glowing cheeks all thanks to the plethora of contouring and highlighting tutorials and products available. To be honest, I haven't really jumped on the bandwagon yet. I mean, I already take forever getting ready without having to contour and highlight my face, what more if I do add that to my beauty regimen? I'm probably never getting out of the bathroom!

NYX sculpt & highlight face duo

However, after trying out the NYX Sculpt & Highlight Face Duo, I became a believer. I found the NYX Sculpt & Highlight Face Duo to be beginner-friendly; just make sure you don't apply too much of the darker shade/contour from the get-go like I did the first time I tried this product on (I ended up rejecting the first video review I did because I ended up laughing and looking like a loon). I suggest you dot the contouring or sculpting product along the areas of your face you want to contour and just pack it on if you're not satisfied with the outcome after blending it out.

If you're not sure how to apply this product and you're too lazy to go online and look at tutorials, there is a handy picture guide on the side of the NYX Sculpt & Highlight Face Duo package. Although, I still recommend watching tutorials especially if you want to step up your contouring game.


nyx sculpt and highlight face duo

I used a blending sponge to blend out the products on my face, but I used separate sponges for the sculpting and highlighting products just so I don't make the mistake of blending it all together to the point where my face looks kind of muddy (as it did the first time I tried the NYX Sculpt & Highlight Face Duo). I'm sure you can use a brush as well, but I haven't tried that method yet.

In my opinion, I feel like the NYX Sculpt & Highlight really helped step up my makeup game. Like I said, I've become a believer. But I still won't contour my face every time I need to go out and get ready. My husband is a very patient man, but I doubt he's THAT patient.

I'll probably reserve the contoured look for when I have somewhere special to go.


Here's a video review of the NYX Sculpt & Highlight Face Duo:


Jul 27, 2016

Beauty Review: Chateau Labiotte Wine Lip Tint

Hi, guys! Sorry I haven't been posting regularly nowadays. I'm currently in my third trimester (right now, I'm due to give birth any minute) and I've been so caught up with this pregnancy and to be honest, have been feeling a lot lazy these days. I've been feeling so tired all the time and just not in the mood to do anything (except eat and sleep). 

I'm definitely going back to posting at least once or twice a week after a month (or if I'm lucky, a few weeks) or so after giving birth. 

Right now though, I have here a review of my latest makeup purchase which is the Chateau Labiotte Wine Lip Tint made in Korea (with real wine extract!). 

I only have for you a video from my YouTube channel and not a text version of the review though so I hope that this will suffice. 


Jun 29, 2016

Beauty Review: Milani Conceal + Perfect 2-in-1 Foundation


Wow, that title is a mouthful! I have been dying to get my hands on the Milani Conceal + Perfect foundation and- if we're being totally open/honest- I may or may not have pestered some sellers of this particular product. I even went to the far end of the north (okay, Trinoma) when I'm from the south just for this (alas! they weren't in stock the day I went; such is my luck, people). 

Finally, I got in contact with StuffinStyle and luckily they have the shade (I thought) I wanted and I'm happy to say that the transaction was very fast. 

So on to my review. 

I like that the Milani Conceal + Perfect 2-in-1 foundation came in a glass bottle with a pump for a more convenient way of depositing the product onto your hand or wherever you put foundation before applying it on your face. Needless to say, the packaging looks quite classy. 

milani conceal + perfect foundation

The only trouble I had with purchasing this product online is that I can't do a sample swatch before buying just to make sure I am getting the right shade, therefore I ended up getting a shade that's a tad darker than my natural skin tone. I had nothing much to worry about though since everything turned out alright. After applying the Milani Conceal + Perfect 2-in-1 Foundation + Concealer, I saw that it wasn't all that different from my skin tone (though I'm still getting a shade lighter on my next purchase). 

Milani cosmetics

Overall, I think that the Milani Conceal + Perfect 2-in 1 Foundation + Concealer really work both ways (as a foundation and concealer). I am very satisfied with the coverage it gives as a foundation (it's medium to full coverage) and as a concealer, I also give it a thumbs up.  It doesn't give you full coverage on the under-eye area (at least for those like me with really dark circles), but it covers up enough (it just makes your under-eye circles much less visible and attention-grabbing). It's actually perfect for when you don't want to pile on too much makeup and/or if you're going for the no-makeup makeup look; just apply it all over your face, groom your eyebrows, swipe on some lip tint and you're good to go!

However, for women like me who have really dark under-eye circles, you may want to apply your favorite concealer on top of this product if you're going somewhere fancy like a date or a special event. 

The product is long-lasting and I've tried washing it off with water (after doing a swatch on my wrist) and it didn't wear off which amazed me. You can take this along when you go swimming! lol! As long as you don't scrub it off under water, you're golden. 

The only drawback to the Milani Conceal + Perfect 2-in-1 Foundation + Concealer is that it tends to make your face quite oily after some time so it's understandable how most people would discourage those with oily skin from using this. But if it's not a deal breaker for you to keep re-touching your face with powder or even blotting your face with blotting paper every now and then, I'm not stopping you. Use this product to your heart's desire. I know I will. 

Watch my (in-depth) review of the product on my YouTube channel! 


Jun 15, 2016

Beauty Review: Pink Sugar Concealer & Lip and Cheek Tint

Pink Sugar

Pink Sugar is a fairly new cosmetics company that launched its brand just last year, 2015 and I've been hearing a lot about them that I decided to finally go ahead and try a few of their products and see what the hype was about. 

I like that they have an affordable price range which is a huge plus for people like me who don't have much money to burn (if any at all). 

Pink Sugar Swatches

The Our Li'l Secret concealer has a thick and creamy consistency, but don't let that fool you. This concealer dries up fast and when that happens, it can become very hard to blend out so my advice is to start with a small amount and blend it fast. I found that it is better to blend with a brush (and maybe a sponge, though I haven't tried applying it with a sponge yet) and to mix it with a bit of BB cream. I suppose you can also try mixing it with a bit of moisturizer, but again, I have yet to try doing that. 

I love the coverage that it gives as it really hides my dark circles and it is definitely long-lasting. However, I did notice that it becomes chalky and/or cakey on the under-eye area which I presume is because of the product drying up. Very unfortunate really since I really like the coverage. 

Our Li'l Secret concealer

As for the Sugar Tint lip and cheek tint, I am baffled by this particular product because I have heard a lot of beauty bloggers/vloggers and even most consumer feedbacks claim that it is long lasting and that it doesn't wear off even after eating which is very untrue in my experience. 

Pink Sugar Sugar Tint
Excuse the upper lip sweat (lol)  
I have worn this lip product 3 times now, all of which wore off after a meal. Am I doing something wrong?! 

Pink Sugar

Again, I really like the creamy consistency and the matte finish of the lip and cheek tint and am also definitely loving the shade I got (Queen Bee), but for the life of me, it doesn't stay on when I eat! It is surprising though that when I drink a glass of water, the tint does not transfer to the rim of the glass nor does it wear off on my lips. So yeah, this one's definitely an enigma to me, lol! 

All I can say is, since Pink Sugar is still a new company, I'm pretty sure that they will be able to improve their products in time and maybe (hopefully) re-formulate these particular products. I'm crossing my fingers. 

Pink Sugar cosmetics
3 hours after applying the products (and also after eating) 

You can also watch the video review I did on these products here:


Jun 7, 2016

Beauty Review: Beach Born Sea Salt Spray

Beach Born Sea Salt Spray

I have been wanting to try this product out ever since I first saw it on BeautyMNL, but I was also feeling a bit hesitant because I already have really curly hair and figured there's not much point in me buying the Beach Born Sea Salt Spray so it stayed on my basket for weeks until one night, when I was roaming around BF Ruins (Good Shepherd's Bazaar) with my brother and husband, I came across a store that sells cute swimwear (Ekai) and my eyes eventually landed on this product which was sitting pretty on a little basket in front of the store. 

I shelled out PhP 180 for this 100mL Beach Born Sea Salt Spray bottle and I regret NOTHING. 

I needed something that would tame my curls because when I let my hair air dry, it can't help but expand and become as fluffy as a poodle's hair (quick fact: I used to be called "poodle" in grade school by some pesky boys from my class because of my poofy hair) and I'm happy to say that this product does the trick. 

First off, it doesn't really smell like anything so that's good. What I normally do after a shower is dry my hair with a towel and when it's not too wet anymore, I just spray it liberally all over my hair, making sure that the front part (the hair that frames my face) gets a good amount of spritz and then I twist them backwards just so they don't get frizzy. I also bring all of my hair in front (I bend my head upside down) and spray it all over to add a "lift" to my hair because as much as I want tamed curls, I do not want my hair to end up looking limp and flat. 

It also says on the back that the Beach Born Sea Salt Spray can be used as a dry shampoo, but if you're curly like me, I wouldn't really recommend doing so because from my personal experience, my hair got really crunchy and hard and I can't even comb my hands through my hair. It was pretty uncomfortable since I felt like I haven't washed my hair for days (when in fact, I only skipped a day of washing my hair). It could also be that I sprayed a lot of the product onto my hair, but whatever. I'm not using this as a dry shampoo again. I will always prefer using this after a nice shower :) 

Watch my YouTube video review of the Beach Born Sea Salt Spray and if you like it, give it a thumbs up! Also, don't forget to subscribe to my channel <3 


May 7, 2016

Beauty Review: Innisfree No-Sebum Blur Powder


Innisfree No Sebum Blur Powder

I have been reading a lot of good reviews about the Innisfree No-Sebum Blur Powder and as you know by now, I'm a fan of Korean beauty products and am always on the lookout for new and/or good stuff. I bought this one from BeautyMNL for Php 598 about a month ago (I know. This is a looong overdue post) and I definitely consider this as one of my best buys for this year. 

Innisfree

When this arrived on my doorstep (by the way, kudos to BeautyMNL for their fast delivery; it arrived the day after I made an order) I was a bit disappointed because it looked small for a Php 598 product, but then what can I do, right? 

It came with a powder puff and this is what it looks like when you take off the lid: 


Innisfree No Sebum Blur Powder

What I do when I use this product is tap the powder onto the inside of the lid (see photo above for example) and press the powder puff on it to get the product and then pat the puff on my face. I also tried using a powder brush with this one, but I find that when I tap out the powder onto the lid, not much comes out and so I feel like I'm not getting enough when I use a powder brush (did that make sense?) whereas when I use the powder puff, I feel like I'm actually getting the powder on my face. 

The first time I tried it on (which you will see in the video below), the time was around 1pm (1:30 maybe?) and I went about my day, doing house chores and meeting up with my brother at the mall, and not touching up. I almost forgot to film an update and only remembered around 9pm that I was doing a review. So yeah, after more than 7 hours, my face stayed surprisingly matte. I did notice a hint of shine on my nose bridge, but other than that, the rest stayed matte. 

Despite my initial disappointment at the size of the product, I am very impressed and satisfied with  the Innisfree No-Sebum Blur powder. I guess when you think about it, a little does go a long way with this one and it might even last me a long time so I think it's definitely worth it. 


Apr 20, 2016

Beauty Review: Holika Holika Sweet Cotton Pore Cover BB + Nippon Pro Blend Sponge

Holika Holika Sweet Cotton Pore Cover BB

Hi, guys! I have another beauty review for you and I feel like it's taken me a long time to put this up. Anyway, so I was running out of BB cream and thought to try out a new one and since I like Korean BB creams, I decided on Holika Holika, a brand that I have never heard of until this year. Holika Holika has a lot of BB cream products you can choose from and I guess one of their most popular is the Aqua Petit Jelly BB Cream, but I decided to try something a bit newer. 

Holika Holika Sweet Cotton Pore Cover BB

The great thing about the Holika Holika Sweet Cotton Pore Cover BB is that you get good coverage with a pea-size amount. That is if you're using your fingertips to apply this all over your face. Since I applied mine with a Nippon Pro Blend sponge, I had to use a bit more than just a pea-size amount. 


Holika Holika Sweet Cotton Pore Cover BB


I have never used a blending sponge to apply foundations and/or BB creams before therefore it felt a bit awkward to me applying the Holika Holika Sweet Cotton Pore Cover BB cream with my Nippon Pro Blend sponge, but I think I went about it the right way. The sponge helped me spread/blend the product evenly on my face and I sort of felt cleaner using the sponge than when I use my fingers (of course you have to always make sure that the sponge or whatever applicator you're using is clean) 

I skipped applying face powder or finishing powder just so you guys could see the result after a couple of hours of wearing the product. 

So during the time I was reviewing this, I didn't go anywhere. I just stayed home and did my regular house chores (washing clothes and dishes, cooking, cleaning, etc.). By around 8pm (I applied the BB cream at around 4-4:30 pm), I could see that the Holika Holika Sweet Cotton Pore Cover BB was still on my face, meaning it didn't completely wash out or faded, but I did also notice that my T-zone got a little bit oily which is only normal especially when you don't apply finishing powder on top of it and you don't retouch (with pressed powder) or use blotting paper. 

Overall, I really like this BB cream and might consider repurchasing in the future. 

Nippon Pro Blend Sponge

As I've previously mentioned, I enjoyed using the Nippon Pro Blend sponge because it was quite soft and it made applying the BB cream easy. Plus, I felt like I wasn't putting germs on my face since I didn't have to use my fingers (and of course, the sponge was clean). I think that the Pro Blend Sponge Cleaner did a good job with cleaning my sponge since it didn't take me more than a few squeezes of the sponge before the makeup stain completely disappeared (although not from the sponge, I'm afraid) and all that was left was clear water. What I didn't like about the cleaner though is that it was difficult to get the product out from the bottle. Like squeezing the bottle won't do you much good. You have to continuously shake it down to get the product out and onto the sponge. I hope they have a pump for the bigger one (I saw on their site that their 100 ml bottle is the same as this little one) for easier use. 

Here's my video review of the Holika Holika Sweet Cotton Pore Cover BB cream and the Nippon Pro Blend Sponge and Sponge Cleaner: 


Apr 8, 2016

Beauty Review: Etude House Tint My Brows Gel

Just like many other people out there, I have a lot to be conscious about when it comes to my appearance; my teeth, my eyes, especially my eyebrows! I have sparse eyebrows so it's quite understandable why an eyebrow pencil, powder, gel, heck even temporary tattoo(!) is a definite must-have in my makeup bag. 

Okay, so about that temporary eyebrow tattoo. It's something I have just recently found out about and the thought of saving time everyday getting ready appealed to me. Enter Etude House Tint My Brows Gel. 

etude house tint my brows gel

I've been hearing stuff about this particular product and thought, why not give it a go? So to the Etude House store I went and purchased their Tint My Brows Gel. I was both nervous and excited as the day came to finally try it out (a day where I had nowhere to be, but at home, safe from the inquisitive eyes of people). 

etude house tint my brows gel

So this is what it says on the back:

Directions:
            1. After trimming the eyebrows without applying skincare product or makeup, apply a liberal 
                amount according to the desired shape of the eyebrow. (Apply a liberal amount to remove the pack easily.)
2. Dry for at least 2 hours. For stronger coloration, apply before going to bed at night and remove the next morning.
3. After drying completely, remove slowly starting from the tail of the eyebrow. (Do not remove the pack forcibly since it may pull out the eyebrow.)
4. Do not use a cleansing product (product with detergency) or apply force on the eyebrow area within 24 hours of using the product.

Beauty TIPs:

1. If skin is too oily or it has lots of dead skin cells, tidy up the eyebrow and surrounding skin before applying the pack to ensure good coloring.
2. If you make a mistake in drawing, correct or wipe clean with cotton swab or clean tissue before it completely dries out.

I got even more nervous when I saw the gooey consistency of this product, but I sucked it up (no, not the product) and proceeded to apply it onto my eyebrows.


To be honest, I wasn't very satisfied with my application since it looked to me uneven and I want my brows to be even. However, I found out that it wasn't that bad. Sure, the left brow looked a bit thicker than I would've wanted it to look, but it's nothing that I can't live with.


Peeling it off was surprisingly easy. Not much eyebrow hair got snagged and the end result looked actually good.


Okay, to be totally honest with you guys, I redid the whole process after three days because I felt like I made a mistake the first time I applied this Tint My Brows Gel. So on the first try, after a couple of minutes of peeling it off (and having this photo taken), I got bothered by the bits and pieces of leftover peeling stuck on my eyebrow hair so I stupidly went to get a piece of cotton, wet it a  bit, and wiped off the leftover peelings with it. I guess you shouldn't do that because it left my eyebrows looking greenish and just plain weird. I had the misfortune of having to go out after that (because I needed to meet my brother at the mall) and while I was browsing through the makeup department, I swear all the saleslady I came across was suggesting eyebrow products. I'm guessing it was THAT obvious that my eyebrows were in a state of despair.

So I tried it out again, this time I was careful not to make my eyebrows look too thick and I definitely did not try wiping the excess peel-off with wet cotton. Needless to say, the result was better the second time around.


Below are a series of photos I took for 4 consecutive days just so you guys can see and compare. By the way, if you want to know how my eyebrows look sans makeup, please watch the YouTube video review I did on this (which I will also paste at the end of this post).


And then here are days 5 to 7:


I don't know if you can see much difference from Day 4 up to Day 7. I did notice that the tint on the tail end part of my eyebrows completely faded whereas the tint on the part of my eyebrows near the inner corners of my eyes did stay up to today, my 7th day, albeit barely noticeable (but upon closer look, you can tell). Overall, I am quite satisfied with this product and if like me, you have sparse eyebrows, you can reapply the tint after 4 days because after that, it's not going to be really noticeable anymore.

What I did when I saw some parts of the tint fading is just fill in those parts where the tint has already faded. It still saves you time getting ready.

So that's my review of the Etude House Tint My Brows Gel and I'm giving it 3.5 stars (I mean, it's not exactly their fault I have barely there brows, right?) and would consider repurchasing.

If you guys want me to review specific products, do let me know on the comment box. I'd be more than happy to oblige :)